Garage Assistant has a module to export to sage, full instructions are also shown on the sage export screen.
When you export to sage, there will be 3 files created you can change the names of these, however they default to :
| • | Customers.csv |
| • | Sales.csv |
| • | Payments.csv |
The files will be saved into a folder on your hard drive called GA_EXPORTS
Each export will only export records which have not previously been posted to sage, this is to prevent possible duplicates.

Run export to current date end - This will locate ALL documents which have been invoiced but not yet exported and export them to sage compatible files, if however you have configured the export to only include fully paid documents then unpaid documents will not be exported
Run Export to Month End - This allows you to perform the export mid month, but keep sage clear of the current months documents.
View Previous Export Data - This allows you view and re-export data which has previously been exported.
Once you have run the export, each invoice or payment will be marked as posted to sage (as applicable) this happens automatically.
1. Next to import into Sage, you would open Sage and perform a backup in sage
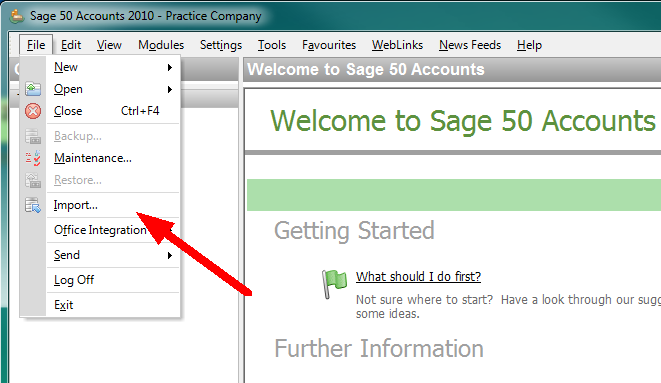
2. First you would need to go to File and choose Import
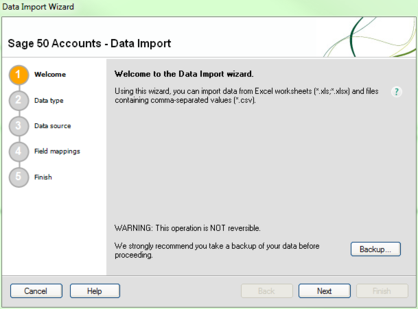
3. This will present you with the Sage Data Import Wizard as shown below, click on next to choose the data type
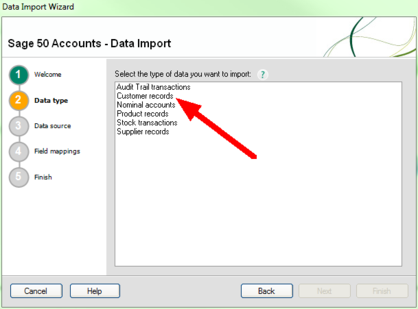
4. You will then be asked to choose the data type for importing. First you would choose Customer Records, followed by clicking Next
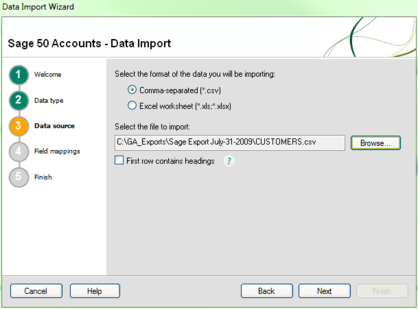
5. Next you will asked the format of file and also to select the file for import,
| • | Choose Comma-separated (*.csv) |
| • | Leave the box labelled "First row contains headings" as not ticked |
6. Then click on browse to locate the Customers.csv file created by GA3
In the Open window, you will need to locate
| • | My Computer |
| • | Local Disk C: |
| • | GA_Exports |
| • | The correct dated Sage Export folder |
This will present a list of files as shown below
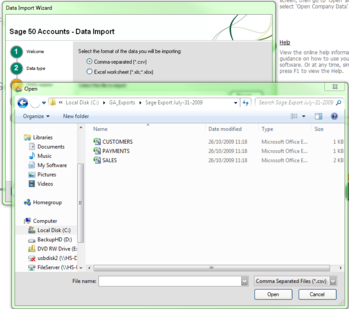
7. Now select the file named CUSTOMERS and choose open.
8. You will now be asked to map the fields in your data to the fields in Sage
Proceed to set in order, each field from A to I as shown in the screenshot below
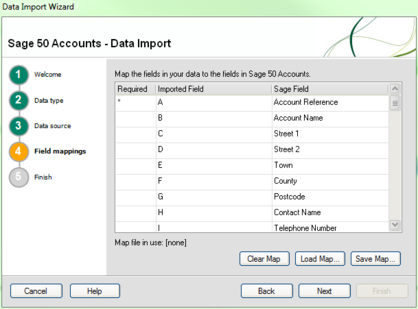
9. Click on Next, followed by Finish, Sage will now import the customers file.
10. Next you will need to select import again, this time choosing Audit Trail transactions as the data type
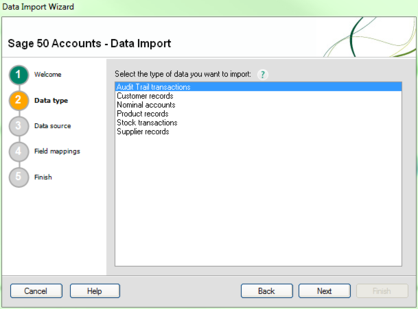
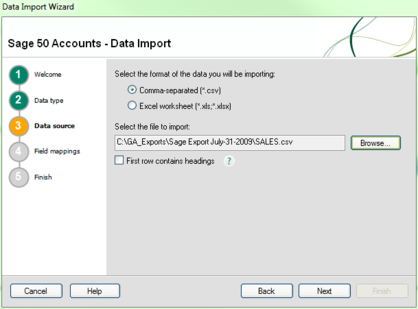
11. Repeat this process for both Payments and Sales as required,
However this time you MUST choose Audit Trail Transactions instead of customers using the same options, Comma-separated and leaving the box un-ticked
12. You will now be asked to map the fields in your data to the fields in Sage
Proceed to set in order, each field from A to J as shown in the screenshot below, all other fields after J (Tax Amount) remain empty
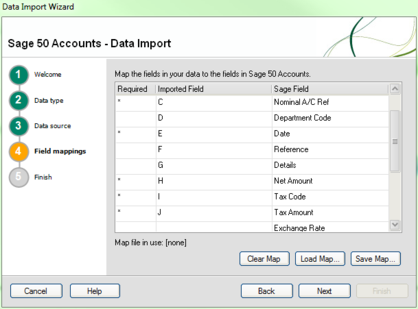
13. Finally click on Next, followed by finish to import the data
14. Repeat steps 10 to 13 for the payments file.
|
For the customers file, you should only map fields A to I (Telephone number being the last field) |
|---|
Two major things to be aware of is :
If when running the import in sage you are presented with an error or warnings dialogue, this does not always mean the data was not imported ! Take a moment to check your sage records before re-attempting an import.
It is difficult to delete anything from sage, so to prevent issues arising ensure you perform a backup in sage before running any import.
|
Running the import on the same files more than once will cause DUPLICATES in Sage
We cannot support any issues directly related to SAGE, whilst every effort is made to ensure the data transfer will run without problems we urge you to check and ensure the transfer was successful and accurate along with keeping regular backups of SAGE incase of problems. |
|---|
GA3 has been tested with Sage for Dos, Sage Instant Accounts 12, Sage Line 50 financial Controller.
RELATED TOPICS |
|---|
|