Stock Control
The stock system within GA4 has numerous options for customisation and can be used whether you track/hold stock or not. The Stock order management allows you to keep track of what parts have been ordered, what you still need to order and also helps manage your stock quantities. When receiving a stock order, you can also have GA4 create an Expense Record automatically
- First thing first, you need to specify the Settings for Stock Control
- Go to ADMIN > Configuration > Stock Control Settings
If you wish to use the order management system, then you need to;
- Ensure that 'Enable Stock order system' is set to Y
- It is also advisable to set "Automatically create Orders automatically for known suppliers" to yes, since this can save time and make it easier to use.
By default, the stock order system is disabled and is recommended to be left disabled for most users of the system, since it adds additional steps that are required when using the system, otherwise, if enabled and ignored, could lead to large lists of items the system thinks is awaiting order, when the system is not being used.
The recommended settings are:
Enable stock order system: N
Enable ordering by prompting each time: N
Allow negative stock: Y *
If allow negative stock is set to no, any items with zero stock will not be allowed to be added to an invoice until you add the quantity to stock, hence this allows you to get on with what you need to be doing and adjust stock afterwards.
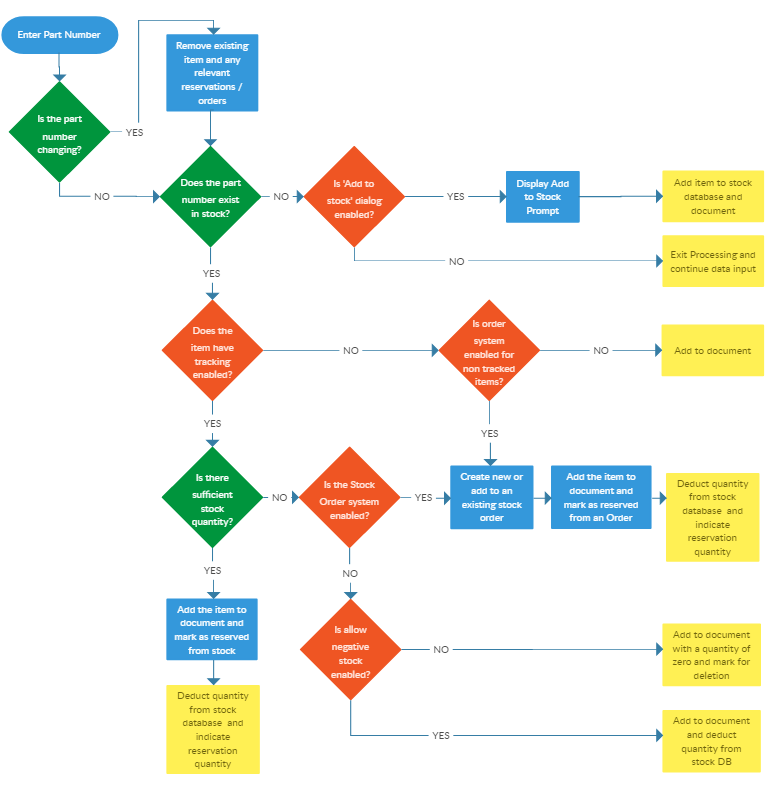
To help with setting up the stock control, we have created a simplified diagram, indicating the steps taken when a part number is entered or selected for a document. The flow will depend on the options specified (see above) and indicated in red in the flow chart.
How the Stock Order System Works if enabled
To view this order simply click on the 'Stock Orders' tab towards the bottom of the screen.
The Stock Order Management Screen will show all Stock Orders and their specific status, whether they are Pending or Ordered. Below this list is a separate section for Previous Orders / Returns and along the right, it will show you Required Stock Items. The Required list shows all items that have been added to a document which were out of stock but, either they don't have a preferred Supplier or again you have turned off ''Automatically create orders for known suppliers''
If you are ready to process an order or wish to add more to the order in question click on 'Edit' and you will be presented with a few more options. From this screen, you can add required items, view Low Stock items in your database or search for a specific item that you wish to add to the order.
When you are happy with the Order, you can use the top buttons to proceed, including 'Set as Ordered' which means the Order has been placed. You will also see that you can email/print the stock order.
Finally, when you are ready to receive the Stock order go to the Stock Order Management screen and click 'View' against the Order in question
Upon receiving a Stock Order you can edit the Cost Price, Retail Price and the amount you actually Received if this is different to the Quantity ordered. If you use the Company Expense Manager to enter your Purchase Invoices this is also when you can set it to create an Expense Invoice automatically.
During the receive order process, any line items on documents will be automatically adjusted to show that the item is no longer reserved from an order. The supplier and order details will also be added to the 'expanded' options section.
If you need to remove the stock item from the document or reduce the Quantity, for whatever reason, and an order had been created/placed/received, then you will have two options. You can either choose to put the item back to Stock or return to Supplier
If you select to Stock it will change the quantity in your Strock Database but, if you select to Supplier the system will create a Stock Return in the Order Management Section.
In a similar way to an Order, click on 'Edit' against the Return and from here you can set it as Returned, print the Return and create an Expense Record ( Expense Credit Note ) automatically.
Print Back to other articles

