
GA3 Network Edition - Recover Command
If your system loses power when the database is opened, sometimes you can be shown the following message, which ensures the system does not actually suffer corruption by making you run a maintenance utility, the recover command.
The message is usually along the lines of: ''The file datafile_main is damaged and cannot be opened, please use the recover command''
This guide is for the Network Edition only.
An alternative guide is available for the Single User / Standalone version
In order to use the recover command, follow these steps:
Before proceeding, we recommend that you make a copy of your ENTIRE Garage Assistant GA3 Install folder as a precaution. Once everything is complete and working as expected, you can remove the temporary copy.
Do not delete any files until you are sure everything is ok.
1) Close GA3 down completely on all clients and the host.
2) On the Host Open your File Explorer and navigate to
This PC > Local Disk (C:)
3) You should see a folder named Garage Assistant V3 Server
As a temporary measure, to avoid incident, click on the folder, then press CTRL C , followed by CTRL V, to make a copy in case of issues.
4) Go into the Garage Assistant V3 Server folder and double click on FileMaker Pro
You will then see a window resembling the following:
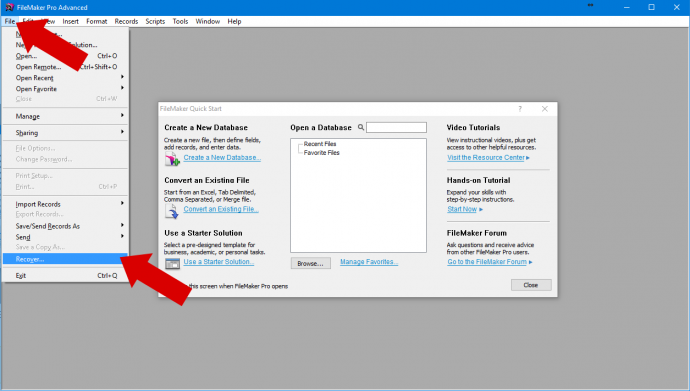
5) Click on File and choose Recover
6) This will now show a File Explorer / Finder window titled "Select Damaged File"
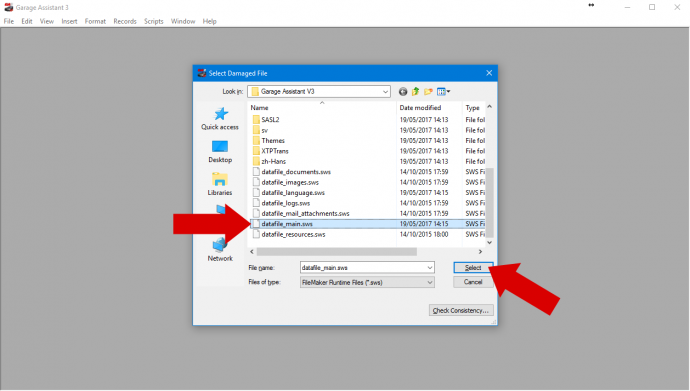
7) Highlight the file named 'datafile_main' from the Garage Assistant V3 Server folder. Ensure the last modified date of the file shows as todays date and that you are in the correct folder..
8) With the file "datafile_main" highlighted, click on Select.
You will then be asked to provide a name for the recovered file, it is extremely important that you make a note of this filename (circled below), it will be required to complete the process. This is usually called datafile_main Recovered.
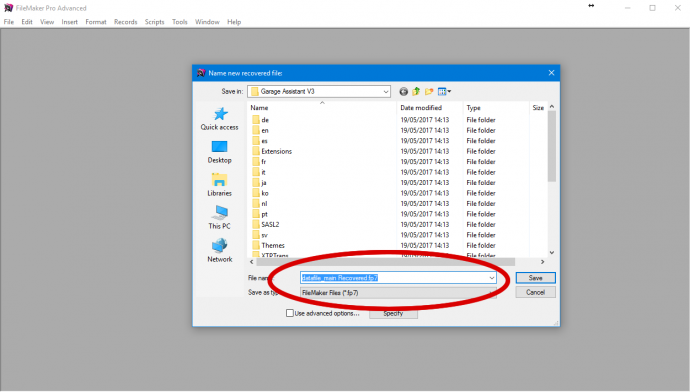
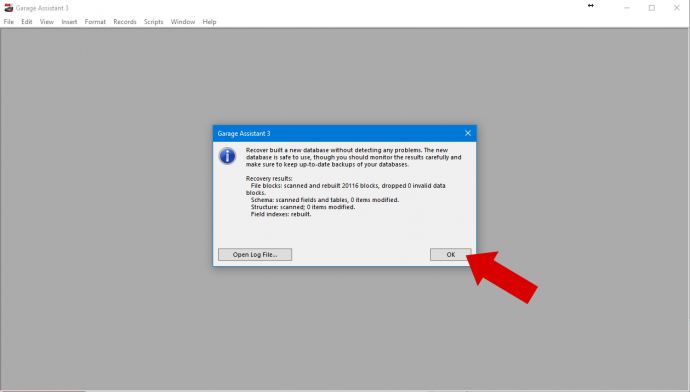
9) Click on Save and the recovery process will now begin and the system will create a new recovered file named as per above. Once Finished, you will see a Brief Description, simply click OK.
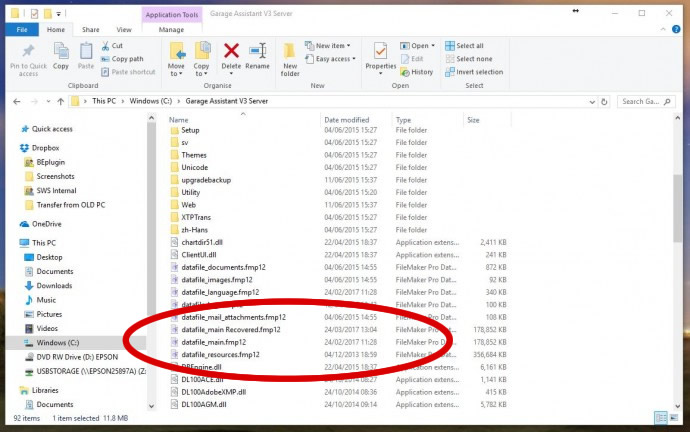
11) You should now see both "datafile_main" and "datafile_main_Recovered". This is the file you made a note of in step 8, These files contain all of your data, so be careful when renaming them.
12) To complete the process, you will now have to rename datafile_main (the original damaged file) to something else, perhaps using the date, i.e "datafile_main_old_01/01/2018"
This file is the original damaged file and will not be used so the name doesn't matter, it is just to free up the filename for the next step..
13) Finally, rename "datafile_main_Recovered" to just "datafile_main" leaving any extension intact, such as datafile_main.fp7 or datafile_main.fmp12. This makes it so the newly recovered file is now the file GA3 will launch with.
14) You should now be able to open GA3 as normal
Note:
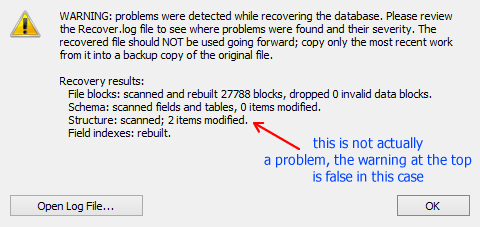
Sometimes, after performing a recovery on a GA3 file, you may get a message warning you not to use the file going forward. However, this can be a false message if the only noticeable change is Structure: scanned; x items modified. (usually 1 or 2) as shown below. If this is the case, ignore the warning message.
Tags: File Damaged, datafile_main, recovery command, recover, ga3 network.
Print Back to other articles